Sleek and Easy Way to Embed a PDF onto Your Moodle Course Area in 5 Steps
Here is a quick tutorial on how to embed PDF document onto your Moodle Course Area and make this available in a viewer frame, all achieved in 5 simple steps. Embedding a Portable Document Format (PDF) file onto Moodle is now as easy as uploading a file and changing some settings to suit,
We start this exercise by first uploading a PDF document to your course area using the file route. Newer versions of Moodle can now automatically detect the type of file uploaded and give it the right treatment. We also take a look at the different parameters that adds functionality to the PDF viewer frame within the browser.
5 Steps to Embed a PDF onto Your Moodle Course Area
Typically, one would just upload and link the PDF document which then appear as links on the course area. Clicking on this link simply opens the PDF document. However, to make this look sleeker, just the way you want it. This also allows for additional information to be added to the page such as instructions to read certain sections or complete certain exercises. The instructions below have been updated for new versions of Moodle.
User Level: Basic to Intermediate
Task: 5 Steps to Embed a PDF into Moodle as a Resource
1. For Start: Log on to Moodle, go to your course and click ‘Turn Editing On’
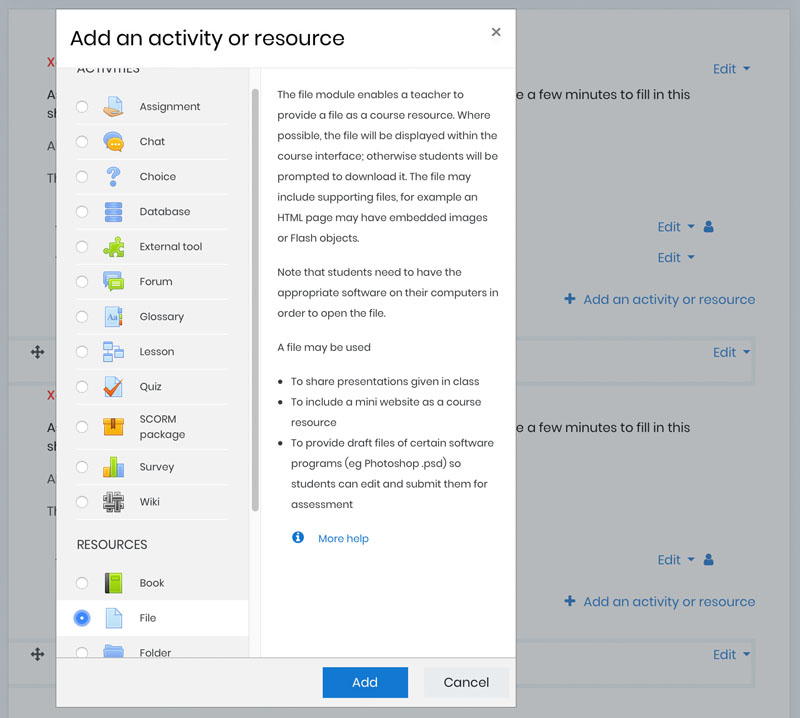
2. Upload your PDF: Under the section you wish to add the PDF document, click on “Add an activity or resource” link then select “File” by clicking on the radio button in the pop-up window (this is found under Resources, you may need to scroll down). Next click the “Add” button.
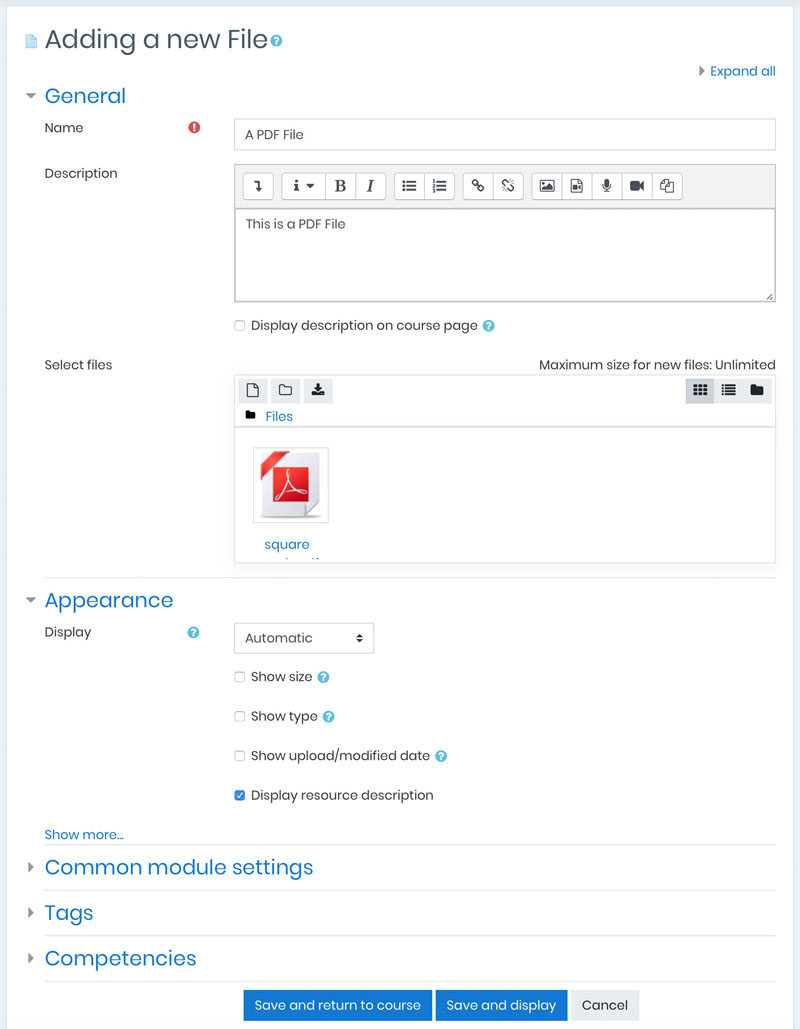
3. Adding a new File: In the new page, complete Name (compulsory)and Description field. Under the “Select files” section, drag and drop the PDF file into the main box to upload the file.
3. Link to your PDF: Once your file is uploaded successfully, it will be listed in the Files folder. Right click on the PDF and copy the URL link. Depending on your browser, this can be “Copy Shortcut” or “Copy link address”
4. Appearance: To change the appearance, click on the “Appearance” accordion to expand it. Change the “Display” settings in the drop down menu from “Automatic” to “Embed” but leave the check boxes with default values. More about this later.
5. The End Bit: Click the “Save and Display” button. This will show you the actual PDF embedded in a page. You can go back to the course page by clicking on the course name in the breadcrumb near the top.
To view the PDF file again as how a student would see it, go to course page using the breadcrumb in the navigation bar. Click on the file link, Moodle recognises this file as a PDF and add red Adobe PDF file icon to it.
Changing the Display Settings
To use other display options, use the following steps:
1. Change Appearance: On the course page, “Turn Editing On”. Next to the PDF file click on Edit > Edit Settings (on the far right). Then click the “Appearance” accordion to expand it.
2. Change Display to Embed: from the display drop-down menu, change from “Automatic” or “Embed” to any of the other display methods, leave the other settings as default. More about the display methods below.
3. The End Bit: Now finish by clicking on “Save and display” button
The Display Options
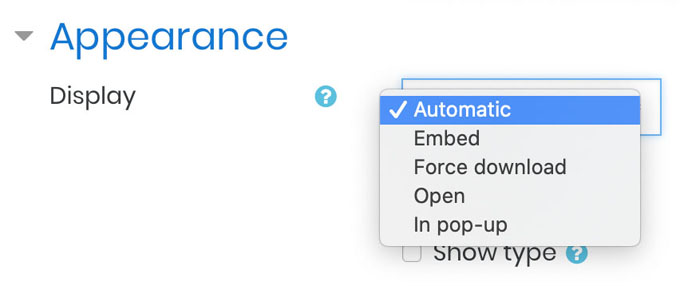
We have seen Automatic and Embed but there are other treatments available for the file when the user clicks on this, they are as follows:
- Automatic – use the best display option for the file type automatically
- Embed – the file is displayed within the page below the navigation bar with the file description and any blocks in the sidebar
- Force download – the user is prompted to download the file
- Open – only the file is displayed in the browser window
- In pop-up – the file is displayed in a new browser window without menus or an address bar
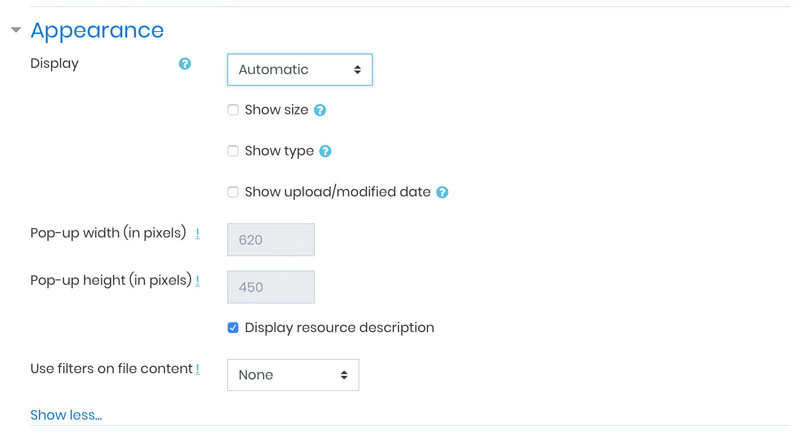
When selecting the “In pop-up” option, you can then decide the Pop-up width and height in pixels. For these settings, click on “Show more…” link at the bottom of the Appearance accordion to expand it further.
For Moodle Version 1.9 and below: 5 Steps to Embed a PDF into Moodle as a Resource
1. For Start: Log on to Moodle, go to your course and click ‘Turn Editing On’
2. Upload your PDF: Under the Administration block, click on “Files” link then “Upload a file” button. Click on “Choose file” button then browse to and click on the PDF you wish to upload, and finally to upload this, click on “Upload this file” button.
3. Link to your PDF: Once your file is uploaded successfully, it will be listed in the Files folder. Right click on the PDF and copy the URL link. Depending on your browser, this can be “Copy Shortcut” or “Copy link address”
4. Create a Web Page Resource: Go back to your course by clicking on the course short name on the breadcrumb. Now still in Editing mode, click on “Add a resource…” drop down menu in your desired section and choose “Compose a web page”. Add the Name and Summary for this Resource. In the Full Text field, click on <> button to flip over to HTML editor mode. Paste your URL link here, then on the next line copy and paste the following line to the Compose a web page, Full Text field after the URL.
<embed width=”900″ height=”600″ src=”http://www.yourdomain.com/file.php/1/Replace-With-Your-Link.pdf#TOOLBAR=1&NAVPANES=0&SCROLLBAR=0″ type=”application/pdf” />
Now cut and paste the URL link overwriting the link in red above.
5. The End Bit: Click the Save and Display button. You can also add additional text or instruction to the same page, simple Toggle HTML Source by clicking on <> button to go back to WYSIWYG editor. You can then add your content that way.
There is More…
User Level: Intermediate
Step by Step Guide: Embed a PDF into Moodle as a Resource – Viewer Controls (Intermediate)
Now that you have completed the 5 steps above for embedding PDF document onto Moodle, try the following variables to enhance your viewer frame on the browser.
Parameters of which values you can change from “0” to “1” to turn them ON.
1. toolbar
2. navpane
3. scrollbar
Changing the “navpane=0” to “navpane=1” turns ON additional controls on the left side of the frame.
And finally, changing “scrollbar=0” to “scrollbar=1” turns ON the scroll bar on the right side of the frame.
You can also change the width and height of the window by changing the values measured in pixels, from 900 and 600 respectively to something bigger or smaller.
For this and many more useful tips and tutorials to make the most of your VLE, check back soon.
NOTE: This guide is written for Moodle version 1.9
Author: Samuel J. Tan

