The Different Image Attributes in WordPress and When to Use Them for Accessibility
It is not immediately clear what the image attributes are for on WordPress. You might think that copying and pasting the same attributes into all the fields after uploading your image is safe but this is just not recommended. We look at how each attribute is different and when to use them.
What Are The Image Attributes on WordPress
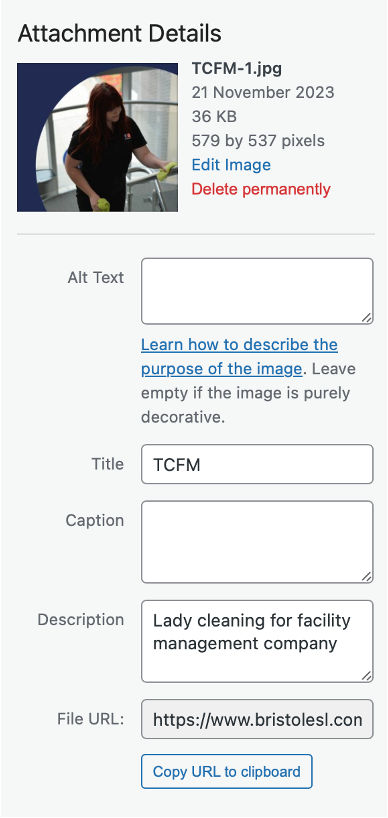
If you have been working on WordPress long enough, you would realise that when uploading images to the media library, you have the option of defining some of its attributes. Sometimes, these are pre-filled with image meta data. Almost all the time, the Title field will be pre-filled with the file name, unless there is a title meta in the image file. Here are the different attributes and fields you can use for an image in the media library.
A. Alt Text – Alternate Text (alt=”…”)
First on the top of the list and most important for accessibility is the Alternate text or Alt text for short. This is sometimes known as the alt attribute and is used to describe image or purpose of the image. While hidden to visual users, it is read out by screen readers and braille display, tools used by visually impaired users, either partly sighted or totally blind to understand your content. Although, depending on what the image is intended for, this is sometimes left blank, empty or null (alt=””) intentionally. It is important to know when to use it, how to use it and when not to use it.
What you add to the Alt text field will be read by assistive technologies such as a screen reader. If you have lots of images on the same page with Alt text, this can sometimes be overwhelming to screen reader users. Additionally, if the Alt text is off-topic e.g. when applied to a decorative image or not related to adjacent text, it can be confusing. You can find a quick guide on how and when to use Alt text in the next section – When and How to Use Image Attributes.
B. Title Attribute (title=”…”
As we mentioned earlier, title attributes are added automatically and is almost always the file name minus the file extension. The only real purpose for this attribute is to present a hover tooltip for those who can read. Screen readers will ignore this value completely and so it is unnecessay and redundant. In most cases, we would recommend removing this value to avoid revealing dodgy file names.

C. Caption
Caption is shown underneath the image on a published page. However, this is redundant when Alt text is already present. You may be tempted to make the caption the same content as the Alt text but this will become repetitive and can cause confusion. Use it only if you wish to describe the picture for those who can see the image and may want to know more, not so much for screen readers. You could use this attribute the image to its owner and/or add a link to their site.
D. Description
Images uploaded to a post, page or directly to the media library get assigned its’ own URL and the image attachment page. It is on the image attachment page that any text added to the description field will show. While optional, it can be the same as the alt text or longer. It can hold as much information as you wish and can contain keywords, and even metadata including attribution or copyright information. Remember that it will only show on the image attachment page and will not be displayed in post or page with your content.
E. File URL
This is not a field you can change but it is in the Attachment details column when picking your image fro the media library. You can copy the image URL here or use the “Copy URL to Clipboard” button.
When and How to Use Image Attributes
Here is where we deal with when and how to use the different attributes.
A. When To Use Alt Text
For the general WordPress users out there, posting articles and adding images to the body of the content, first consider the purpose of the image:
- Informative image: conveys more information not featured in adjacent text
- Decorative image: do not convey any information or information also described in adjacent text
- Functional image: images or icon used as links or buttons that performs a function
- Image of text: readable text within an image
- Complex image: graphs and diagrams that convey data or detailed information including infographics
- Group of images: multiple images that convey a single piece of information
- Image map: image with multiple clickable zones
- Featured image: used to represent the article (post or page).
Different rules apply to different type of image above. For the average user, it is safe to say that typical images fall under the first four categories, information, decorative, functional (linked) and image of text.
Informative Image
This category of image adds further information to the content not featured in adjacent text. They are typically pictures, photos or illustrations that graphically represents concepts and information. Use the alt text to add a short meaningful and related description to convey essential information.
Decorative Image
Decorative image are eye candy, general stock photo or graphics that do not convey any information. The sole purpose of the image is just as visual decoration and is not required to understand the content. This could also be an image with information already described in the adjacent text. For decorative image, leave the Alt text empty/blank.
Functional Image
Functional image is an image use as a link or button. When turning an image into a link or button, do not describe the graphic or image itself in the Alt text like you do with Informative image. Instead, use Alt text to describe the purpose, functionality or destination of the link or button e.g. “Print this page” “Submit” “More information on a subject” “Mr Smith’s profile page”.
In WordPress, you can choose to make your image a link. After uploading your image to your post, click on the image and then click on the Pen icon to Edit its attribute and target. From the image detail window under Link to… choose Custom URL and add your target address in the address field.
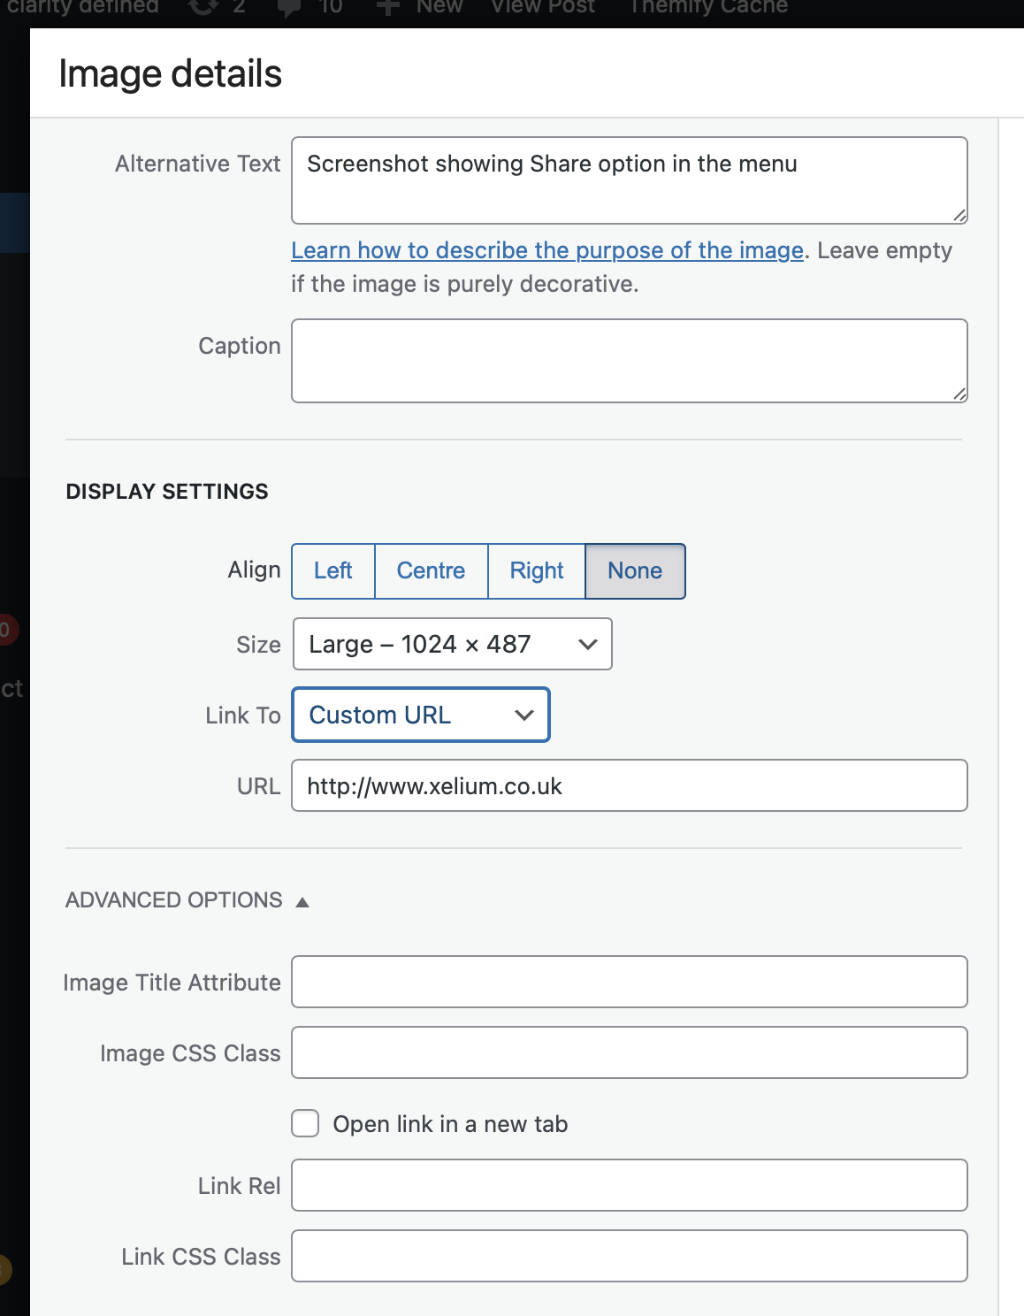
Image of Text
When readable text is presented within an image or graphic, this cannot be read automatically by screen readers. Logos aside, avoid text in images wherever possible. If you have to include an image of text, use Alt text to describe the image. It should contain the same words in the image and short description of accompanying image. If however, the content of the image is already described in adjacent text then you may leave the Alt text empty/blank.
Complex Image
Image of brochure, poster, flyer, leaflet, graphs and diagrams with text and graphics is sometimes uploaded to a post. These complex images carry lots of information but are not available to screen readers. To convey the data or detailed information not already described in the adjacent text, you will need to provide a complete text equivalent of the data or information provided in the image in the Alt text. If this is too much, add it to the adjacent text. You can then decide to leave the Alt text empty or add a short description e.g. “Promotional flyer for the event described here”
Groups of Images
This could be a collage or collection of images that share the same theme used to describe a concept or a single piece of information. This can be classed as decorative e.g. a collage of photos taken at an event or informational e.g. steps for a tutorial. If it is the latter, use Alt text to convey the information for the entire group.
Image maps
Not one for the typical user, but an image that contains multiple clickable areas should have Alt text that describes the overall context for the set of links to include the purpose and destination of the links.
Featured Image
We found that even with the Title attribute empty, some plugin or theme would also automatically append the title of the post as the title of the featured image. This happens when no Alt text is defined and the featured image is used as a link. Should you choose to use an image as a featured image and it is in turn used as a clickable post thumbnail in a post list, be sure to add meaningful Alt text. In such a case, this will create a case or redundant links where the post thumbnail and the post title links to the same page. To avoid this, turn off the link for the featured image.
B. When To Use Title Text
Use of title text is to be avoided altogether. If this is pre-filled with the file name, remove it. Some say it is useful to search for the image in the image library later but we find that even without the title attribute, we can still find the same image as the search also looks at the file name itself. So it would be good practice to use meaningful names for your files.
If you really must use the Title text, this would only serve to add a hover tooltip to sighted users.
C. When To Use Caption
Image caption is often used to describe what is going on in an image. It can be redundant when you already use the Alt text for this purpose. Only use the image caption if you have more information to offer. While sighted users have the benefit of seeing the caption underneath the image visually, it will be read out by screen readers on top of the Alt text and can sound repetitive if they are the same.
D. When To Use Description
As we have learnt in functional image, WordPress lets you turn an image into a clickable link. It is in the same menu option that you can choose to make your image open its own attachment page. Click on the image already uploaded to the body of your content then click on the Pen icon to edit. From the image details pop-up window under Link To… choose Attachment Page from the pop-up menu. A URL field will reveal itself. This is the link to the attachment page.
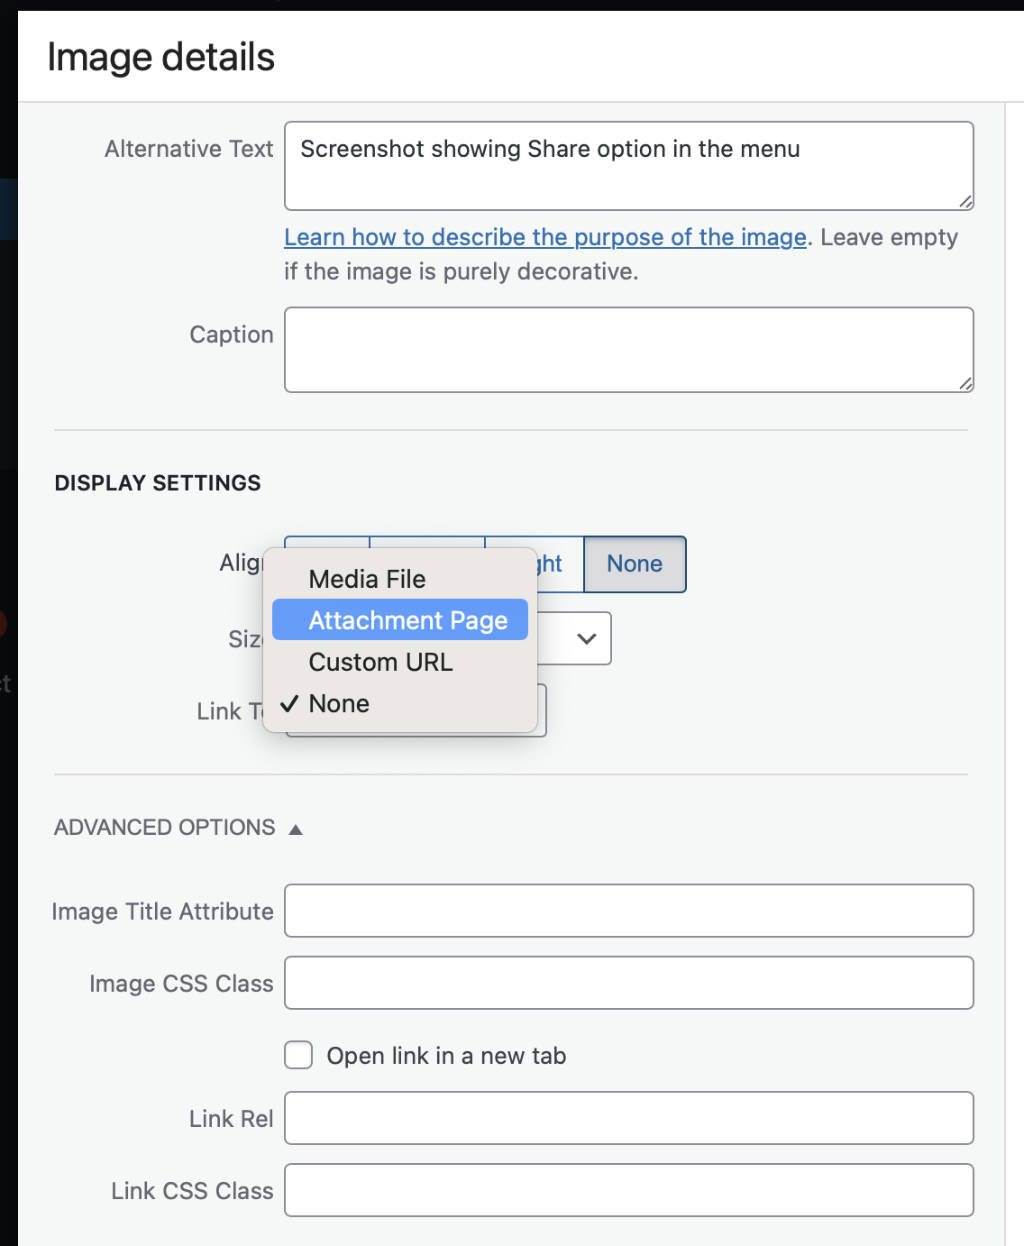
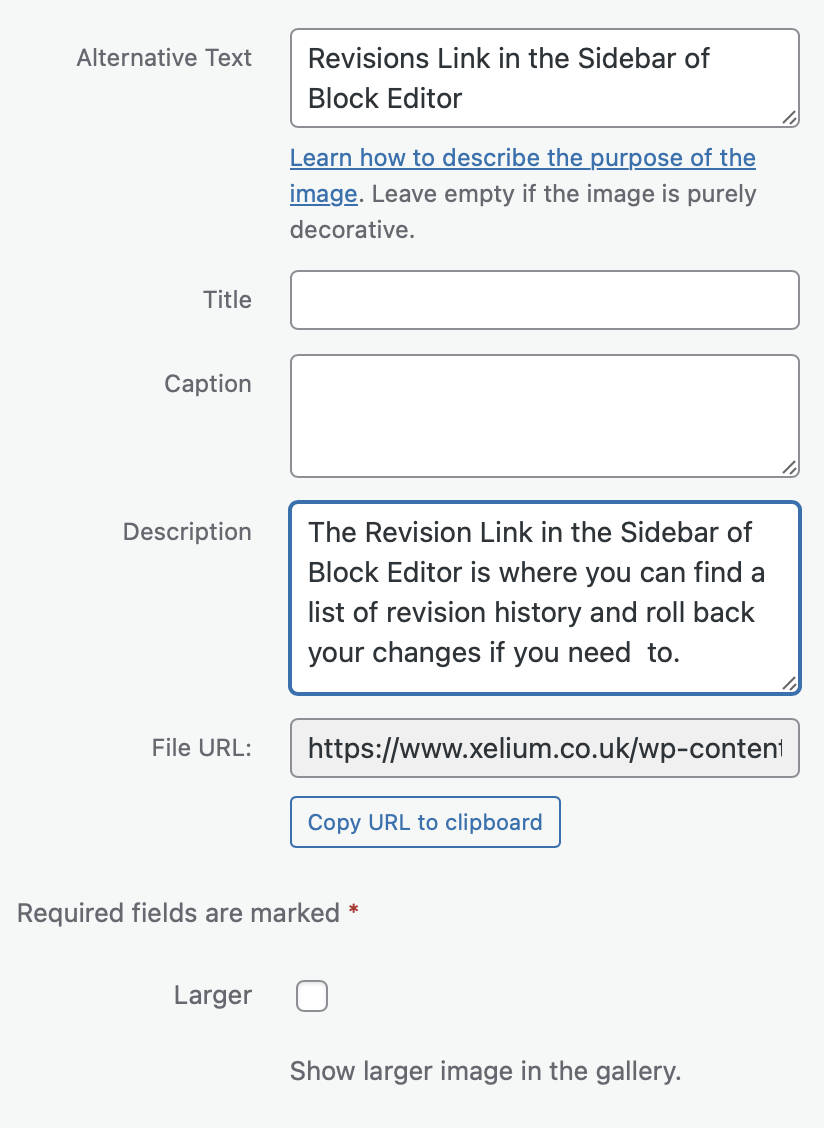
To add to the Description field of an image, you will need to look for the image in the Media Library. Click on it to select and edit the Description field in the sidebar.
Going back to your post or page, once you have set your image to link to its Attachment Page, it will now show the image and the description you just added there. This is also where the Title attribute will be displayed albeit on top of the image.
Summary on the Use of Alternate Text
Here are the steps to help you make the right decision when it comes to improving the accessibility of an image in WordPress.
Step 1: Remove Title attribute
By default, the Title attribute is added and is carried over from the metadata or filename. Remove this as it is usually redundant.
Step 2: Decide if image is informative and not described by adjacent text, add Alternate text OR decorative i.e. just for visual or eye candy or already described by adjacent text, leave alternate text blank.
Step 3: Decide if image is a link and not described by adjacent link text, add Alternate text to convey the destination or action taken. If described by adjacent link text then leave Alternate text blank.
Step 4: If there is text in the image not present otherwise, include the text of the image in the alternate text. Also provide brief description of accompanying image if any.
Step 5: If the image is an icon, convey its function e.g. “Print this page”, “New window”, “Search” in the alternate text including when used in a button.
Step 6: If the image is a brochure, infographics, graph, or carry complex information, include information contained in the image or offer a brief description then the complete information in the adjacent text.
Step 7: If the image is a collage/collection that contains multiple images, and is informative, add alternate text to describe a single piece of information. However, if used as a decorative image then leave Alt text empty.
Step 8: If the image is to be used as featured image that is not a link on a list page, remove Title attribute and add Alternate text. Often featured images on list page are used as links and this can be redundant when there are adjacent title links.
