Add Facebook Widgets to Moodle
Facebook is the greatest and biggest social networking site at the moment and Moodle has the largest user base as the learning platform of choice for education and professional training world wide. To begin to take advantage of Facebook on Moodle, there have been attempts at developing Facebook modules and plug-ins for Moodle in the past but nothing concrete.
What if adding Facebook widgets or buttons to Moodle is as easy as copying and pasting some lines of codes, similar to Add Twitter Widget to Moodle tutorial we just ran. So here we go again, in 5 easy steps on how to embed Facebook widget into Moodle (and WordPress).
1. Get your Social Plugin
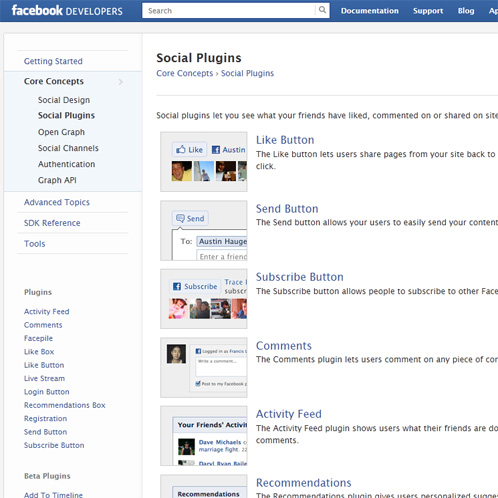
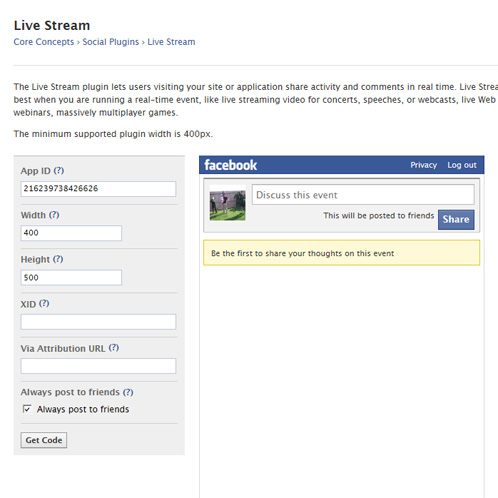
Go to https://developers.facebook.com/docs/plugins/ and choose your Facebook social plugin to embed into Moodle. For this tutorial we will choose the Live Stream plug-in. Live Stream allows students to interact, share activities and comments during a live event such as a lecture or talk.
Live Stream allow students to interact, share activities and comments during a live event such as a lecture or talk.
On the Live Stream page, leave all settings as default except to tick the check box for Always post to friends at the bottom if so wish. You will see a preview of your Widget on the right.
You may increase the dimensions of the block if you want but generally 400 to 500 pixel width is recommended.
2. Click Get Code Button and Copy the Codes
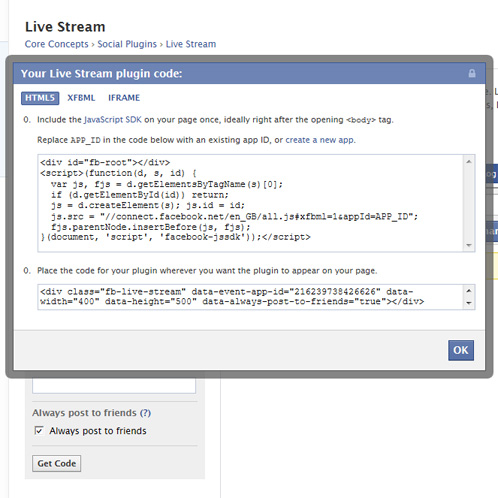
Click Get Code button, a pop-up window will appear (as shown below) with two panes and three tabs. Use the HTML5 tab, this should be selected by default. Leave this window open and start another browser window. We will need the codes later.
3. Login to Moodle and Go to Your Course
In the new browser window, login to Moodle and go to the course you wish to add the Facebook Live Stream.
4. Turn Editing On and Paste Your Code
Click on the Turn Editing On button on the top right corner and click on the edit icon (hand holding a pen symbol) on one of the Topic Summary in the main course area.
Topic Summary is the region next to the topic number (or week number if weekly format is used) before the list of activities and resources for each topic section.
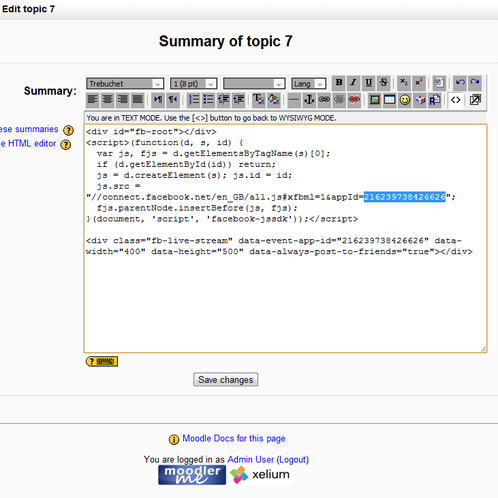
In the edit Topic Summary windows, switch to HTML mode by clicking on the <> button on the WYSIWYG editor’s top menu.
Go back to the previous browser window and copy and paste the Facebook codes, one on top of the other. Remember to copy the app ID from the bottom pane of the code pop-up and put this in place of APP_ID.
The placement of the app ID is highlighted in the screenshot above. Each app ID is unique and you must use the one provided in your code.
5. Click Save Changes and View Your Facebook Widget
This will bring up the course page, now click Turn Editing Off button.
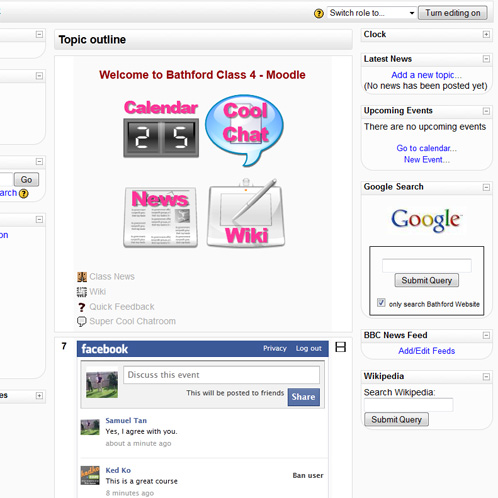
The page will reload and you should see the Facebook Stream as shown in screenshot below.
Now, you may choose to add this to the side bar, in pretty much the same way using a HTML block but watch out for the width. You can change the width easily and grab the codes the same way, just remember to add the app ID.
WordPress: for WordPress copy and paste the codes into a Text Widget for the sidebar or similarly at the bottom of your article by switching over to HTML mode and pasting the codes there.
We also recommend the following plug-ins:
- Like button and Like box– most commonly used plugin to display stream from facebook page, users including those you might know that liked the page and the button to like the page. This is great for pushing traffic to the facebook page and is used widely by websites and blogs.
- Send button – in a social and education content, this is great for students to share your course with others. The plugin simply creates a sent button and all you do is paste the link to your course on the URL to Send field.
- Subscribe button – If you are an avid facebook user and would like others to subscribe to your public updates on facebook, here is a plugin to generate your very own subscribe to me button.
- Recommendations – This is a great social plugin allowing you as a teacher to personalise a list of facebook pages and suggest this to your students.
If you have used Facebook in your lesson with Moodle to engage students, we would like to hear from you.


5 Steps to Make Moodle More Social | XELIUM : clarity defined
16 May 2012 @ 12:03 pm
[…] Follow the steps in our tutorial to Add Twitter Widget to Moodle and start embedding twitter accounts for the whole Schools on the Moodle Front Page, for Departments on the Category pages or Course pages and on to the Social format course page (see step 3 on how to create a Social format course). If Facebook is allowed on the School’s network, similar Facebook widget can be added to Moodle. See our tutorial on how to Add Facebook Widget to Moodle. […]
21 May 2012 @ 2:07 pm
This looks great but I can’t get it to work on my moodle 2.2 site. When I paste in the html code and click update the code doesn’t save. Is this a security setting on my site and if so how can i change this.
Any help would be appreciated.
Kind regards
22 May 2012 @ 8:48 am
Hi Mark, looks like the developor page for live stream stopped working for me http://developers.facebook.com/docs/reference/plugins/live-stream/
The code does work on moodle 2.2. You could try a different browser.
4 July 2012 @ 8:28 am
OK, I had problems similar to Mark Glynn.
There is a workaround. It works in 2.3 for me. I had to tweak the last tags though.
Added a . in the body of the tag. Seems like Moodle HTML does NOT like an empty div tag for this one ?
So, it works as follows…
The last Tag was modified to read as follows ( notice the “.”)
….friends=”true”> .
cheers
venu
14 February 2013 @ 12:59 am
There is no more live stream. Now they switch to comments box. I tried to apply the comments box as live stream on moodle but nothing appear.
The Ultimate Facebook Guide for eLearning Professionals: 16 Golden Tips to Follow #yam | uwseteam
25 June 2015 @ 12:07 pm
[…] https://www.xelium.co.uk/2012/05/add-facebook-widgets-like-buttons-to-moodle/ […]