How to Enable Groups in Moodle, When to Use Groups & Activities that are Group-aware
Enabling group mode and using it in Moodle is essentially an easy three step process (if you do not include grouping). Enable group mode in the course, create and assign students into groups and tweak your activities (forum, assignment, quiz) to use separate or visible groups. Almost all activities on Moodle are group-aware so you do not need multiple activities for each group.
Why Use Groups
Some of the benefits of using groups are as follows:
- there is no need to duplicate an entire course for each group of users (intake, classes, cohort) or instructor.
- there is no need to duplicate activities (assignment, forum, quiz) within the course for different groups.
- create a sense of community among cohorts and allow them to support each other within the course.
- simplifies the administration of students by putting the into classes, intakes, cohorts, instructors or teams.
- support differentiated instruction for different cohorts, intakes or academic levels in the same course.
- interact and engage with different groups separately including ability to enable cross group collaboration with Visible groups mode.
- enhance collaboration and teamwork and offer group-specific activities like forum and assignments.
- personalised learning by creating tailored activities, resources and deadlines for different groups based on their needs and abilities.
There are plenty more reasons for using groups but the list above should do for now.
When to Use Groups
Group mode in Moodle courses is a powerful feature that enhances collaboration, personalisation, and flexibility in teaching and learning. It is particularly useful when instructors want to divide students into smaller units for activities like discussions, projects, or peer reviews, enabling tailored interactions and fostering a sense of community within groups.
Group mode can be employed in scenarios such as team-based assignments, peer learning forums, or differentiated instruction to cater to diverse learning needs. Group mode can also be applied to divide students by intake, classes, cohorts, delivery modes, clients, department, advisors or instructors, times, special needs and more.
Whether it’s ensuring privacy within separate groups or promoting cross-group visibility, understanding when and how to use group mode allows educators to create dynamic, inclusive, and engaging learning environments that support both individual and collective growth.
| Separate Groups | Visible Groups |
| Students in a group can only interact within their group. | Students can interact with their group but can also see other groups. |
How to Enable & Use Groups in 3 Easy Steps
Enabling groups in a Moodle course involves configuring both the course settings and group-specific settings. Start by enabling group mode in the course, then create groups to add your students in. After adding students to groups, you can also add
Here’s a step-by-step guide:
Step 1: Enable Group Mode in the Course
The first step to enable group at the course level.

- Log in to Moodle as a user with editing privileges (e.g., teacher or admin).
- Navigate to your course.
- Open Course Settings:
- In the course navigation menu, click on the gear icon (⚙️) and choose Edit settings.
- Scroll to the “Groups” section:
- Locate the “Group mode” option. Choose one of the following:
- No groups: Groups are not used in the course.
- Separate groups: Students in a group can only interact within their group.
- Visible groups: Students can interact with their group but can also see other groups.
- Optionally, check the box for Force group mode to apply this setting across all activities in the course.
- Locate the “Group mode” option. Choose one of the following:
- Save Changes:
- Scroll down and click Save and display.

In most cases, the “Separate groups” is the option to go for to separate students into their own cohort, class, intake, delivery method, clients, departments, advisors, teams etc.
Step 2: Create Groups
Example of Groups by Intake Month: “Feb 2025 Intake”, “Mar 2025 Intake”, “Apr 2025 Intake” or to assign intake, class or cohorts to different instructors, “Feb 2025 Intake – Alice C”, “Feb 2025 Intake – Bradley E”.
- Access the Groups Page:
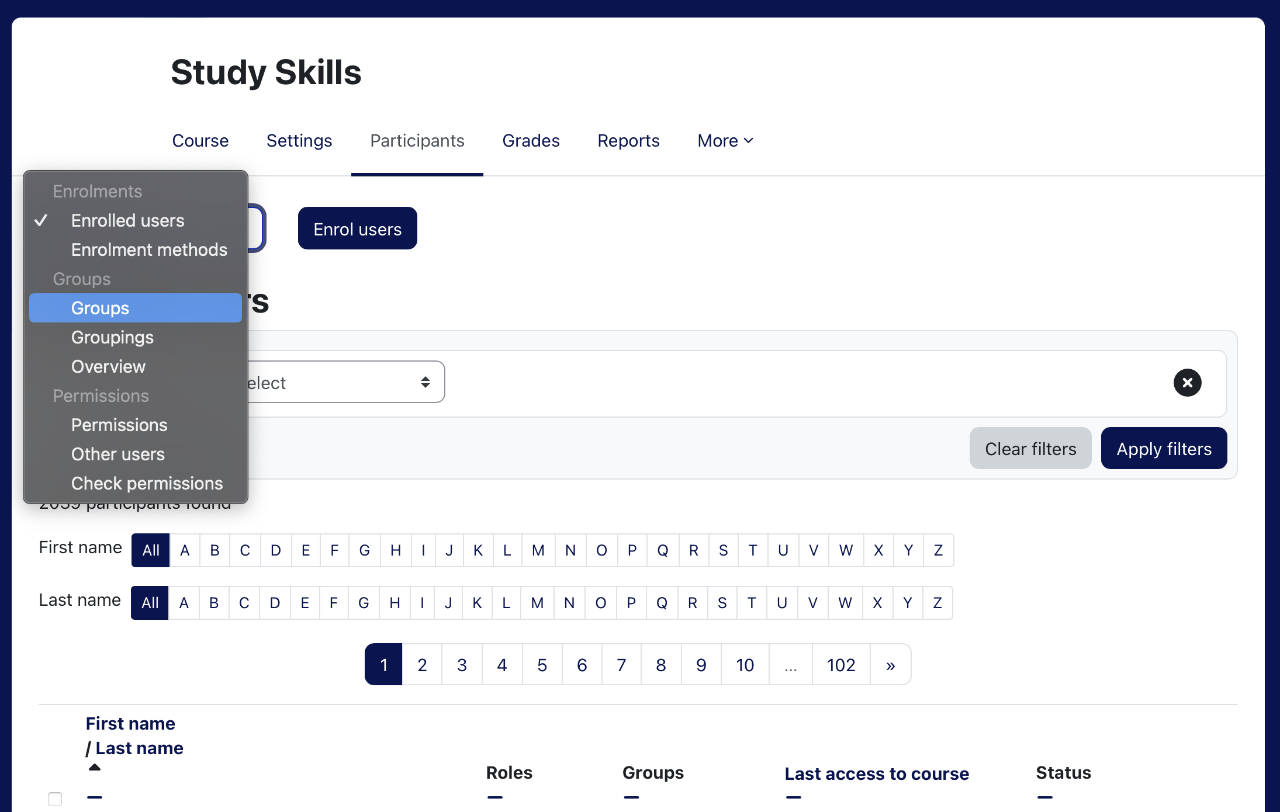
- In the course navigation menu, click on Participants then from Enrolled users drop down menu, click Groups OR click on the gear icon (⚙️) and select Groups from the drop-down menu under More
- Add Groups:
- Click on Create group.
- Fill in the group name, description (optional), and other settings such as group picture.
- Click Save changes.
- Add Participants to Groups:
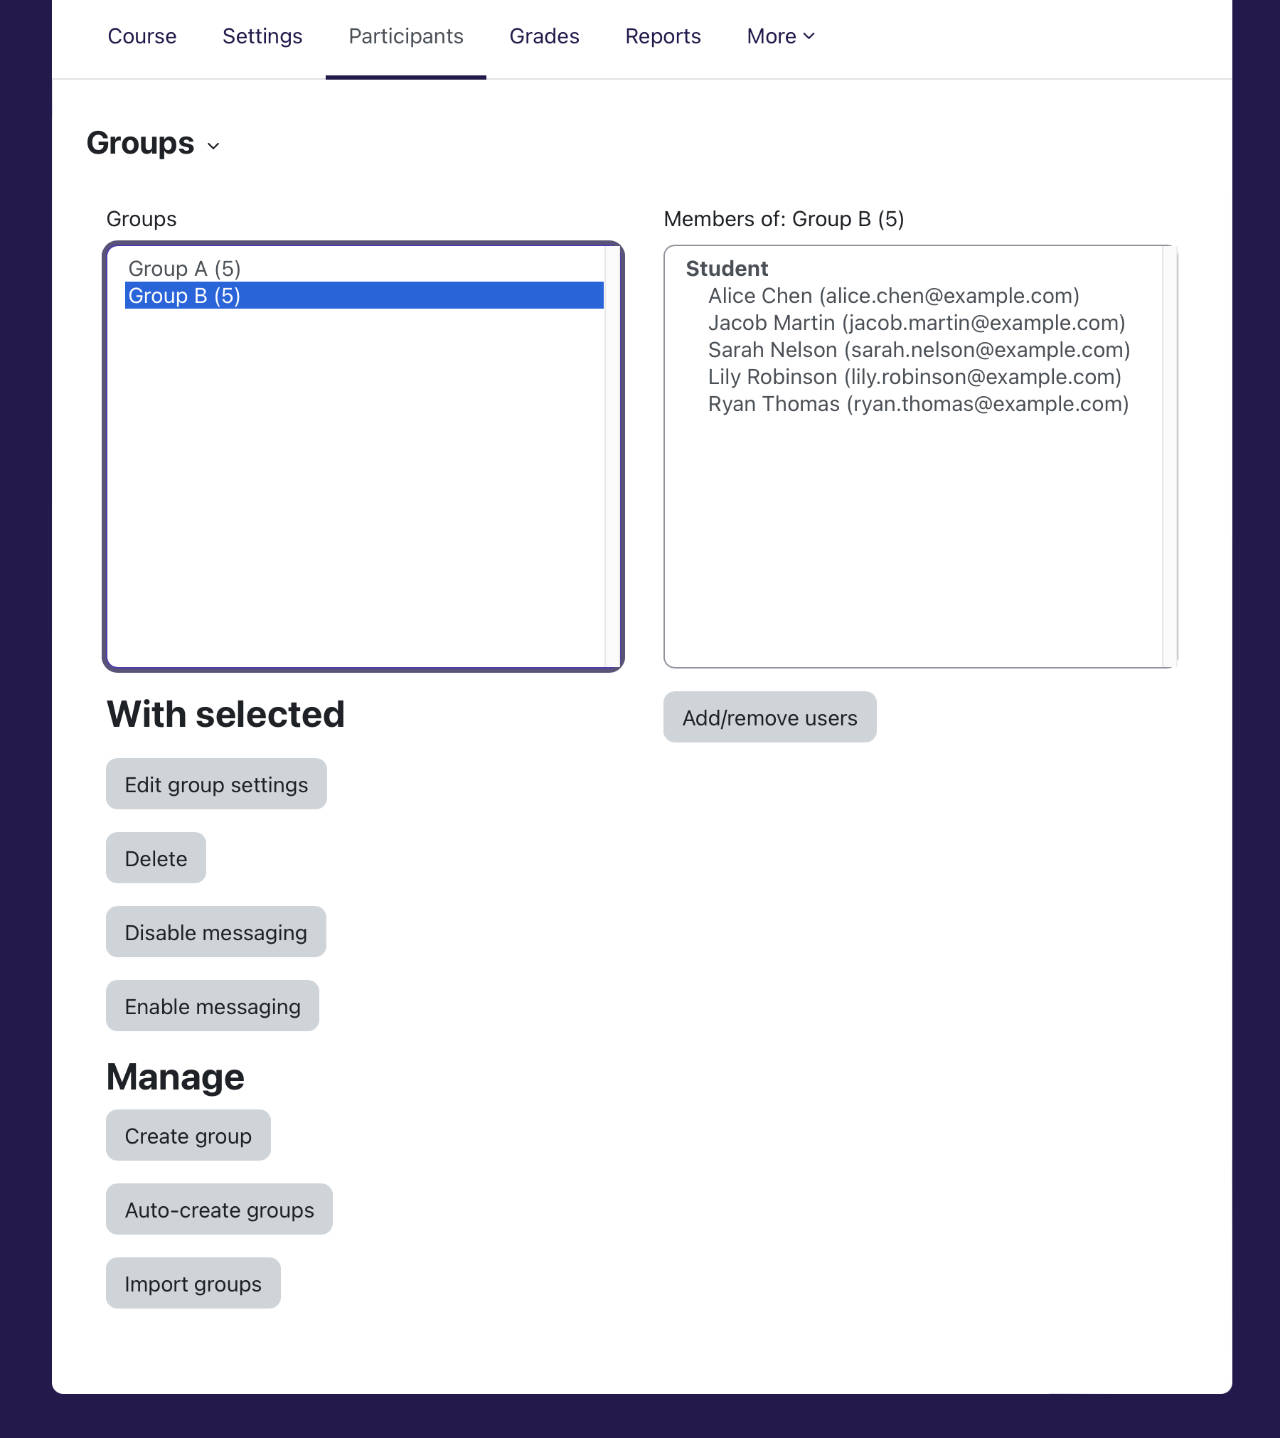
- Select a group and click Add/remove users.
- Select participants from the list on the right and use the Add button to move them into the group.
- Click Back to groups when done.

Groups can also be assigned when creating the users using CSV upload when creating a whole cohort or intake of students. You can still change the students group assignment manually using the steps above to add or remove students from the group.
That’s basically it. You can set Groupings or tweak the group mode for each activity. Continue to step option steps 3 and 4 below to learn more.
Step 3: (Optional) Create Groupings
This is strictly optional. Groupings are collections of groups used for specific activities.
- In the Groups page, switch to the Groupings tab.
- Click Create grouping, give it a name, and save.
- Add groups to the grouping by selecting it, clicking Edit, and choosing Add groups.
Step 4: Apply Groups to Activities
The group mode set at the course level is default for all activities so there is no further action required but you can tweak this using steps below but not if group mode is forced at course level
- Edit the Activity Settings:
- Open an activity (e.g., forum, assignment, quiz) and click Edit settings.
- Scroll to “Common module settings”:
- Set Group mode to Separate groups or Visible groups based on your preference.
- Optionally, select a Grouping if you are using one.
- Save and return to course.
NOTE: If your group cannot see restricted content even with the correct rules in place, consider the Group membership visibility setting. We have written a separate tutorial to show you how to set this should over at Hide/Show Restricted Content Not Working: restricted content now showing resolved.
Activities on Moodle that Support Groups
Almost all activities on Moodle support the Group functionality, meaning they can be configured to respect group settings like Separate groups or Visible groups. Here are some commonly use activities:
| Activity | Group Mode Functionality |
| Assignment | – With Group is enabled at the course level, Assignment automatically supports Separate groups. – Tutors can list and grade students by groups – Group submissions allow one member to submit on behalf of the group. |
| – Feedback and grades are given at the group level. | |
| Forum | – Discussions can be restricted to groups (Separate groups). |
| – Interaction is maintained while allowing visibility of other groups (Visible groups). | |
| Quiz | – Access can be restricted to specific groups. |
| – Group mode does not inherently change quiz behavior. |
Other activities that support group mode include database, glossary, choice, wiki, workshop, chat, survey, feedback and lesson.
Using Groups for Non-Group-Aware Activities
For activities that don’t natively support group modes (e.g., labels, pages), you can use the Restrict Access feature to limit visibility to specific groups. Activities that are non-group-aware are as follows; Book, File, Folder, Label, Page and URL.
To use the Restrict Access feature to make the activity available only to specific groups:
- Edit the activity or resource settings.
- Scroll down to the Restrict Access section.
- Add a restriction based on the desired group or grouping.
- Save changes.


